|
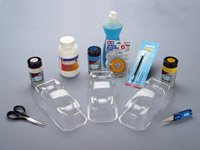 |
| Here are the supplies we gather before we begin: Three Team Losi CK Mini T bodies, Parma FasMask, Tamiya masking tape, Pactra spray paint, dish soap, Dynamite Lexan scissors, and a Sportwerks reamer. |
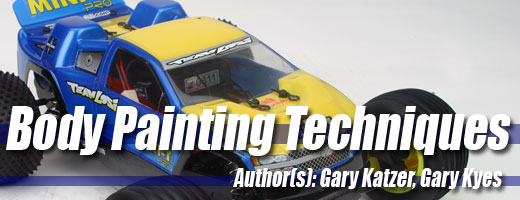
When it comes to RC related tasks, painting a body can be one of the most intimidating tasks for a modeler. There are so many talented people out there who create masterpieces that painting your first body can be rather daunting. I have seen many of these people at racetracks and clubs around the country running what I call the “One-Color Wonders .” They simply went to the hobby shop shelf for a can of paint, masked the windows, and blasted the body with a single color. If this describes you, then there’s great news on the horizon. I spent some time recently talking with one of the most experienced painters today, Team Losi’s Gary Kyes, about some basic and easy painting techniques that just about anyone can use to make a statement with their paint.
Body Preparation:
If you’re new to the hobby, you might not realize that Lexan RC bodies are actually painted from the inside. The shine and sheen that you see reflecting off a body doesn’t come from the paint, but rather from the reflective nature of the Lexan itself. I’ve seen many bodies at the track or at club even ts with sections of paint that have been chipped away, leaving large gaping clear areas on the body. This happens because the body was not properly prepared before the layers of paint were applied. There is a mold release agent that is sometimes sprayed on the inside of the body to allow it to come off the mold without sticking. While this agent makes it easy to pull the body off the mold, it also prevents the paint from sticking to the inside of the body. You will need to thoroughly wash and rinse out the body with warm water mixed with liquid dish washing detergent to remove any left over residue that might still be on the body. It’s a simple thing, but one of the most commonly overlooked. Once the body has been washed and rinsed out, dry it with a lint-free cloth or towel such as the Team JR pit towel (P/N JRPP100). Then you are ready to mask off the body for paint
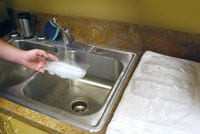 |
| Use warm, soapy water to wash out a body before you begin painting, this will wash off any residue or dust that may be inside. |
Gary Kyes: Getting a body washed, rinsed, and dried is really an important step that some people overlook or don’t pay nearly enough attention to. If you don’t do a thorough job of drying the body you may run into problems with the paint not adhering properly. I have often used compressed air to blow out the remaining water from all the nooks and crannies that you might otherwise miss. You can also try shaking the body out or swinging it in an effort to get the last little drops out. Do not use paper towels when drying off the body . A regular clean dishtowel works well. Paper towels leave fuzz or lint behind, plus they break apart when wet. And here’s one final tip when cleaning off the body. It ’s not only important to wipe down the inside of the body to dry it, but don’t forget to wipe off the outside of the body as well, to neutralize any static charge that can attract overspray and cause “ghosts” or streaks in your paint.
Masking and Planning:
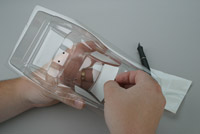 |
| Pre-Cut window masks make life so much easier. Take your time when applying the masks, lining up the mask edges with the etching inside the body. |
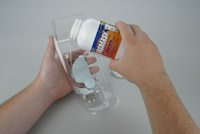
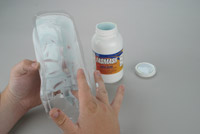
To make painting the body even easier, every Team Losi body includes pre-cut window masks. But if you want to create something other than a basic paint scheme, you will need to use either masking tape or some sort of liquid masking product. Many people like to use masking tape as it is relatively inexpensive, it can be applied to the inside of the body quickly, and you can immediately start painting once the masking tape is in place. There are many painters who personally prefer liquid masking products, such as Parma’s Faskolor Liquid Mask (P/N PAR40282: 8oz; PAR40283: 16oz) for several reasons. With liquid mask, you have the ability to work with more complicated designs if you prefer, the odds of having a bleeding problem can be reduced, and, for me at least, it’s easier to plan out the design. The dow nside of liquid mask is that you will need to wait, usually overnight, for the mask to dry on the body. You can speed up the drying process with the aid of a hair dryer.
|
|
| Parma ’s Liquid Mask is one of my personal favorites. All you need to do is pour the liquid mask inside the body, spread it around, and let it dry overnight. |
Many people go out and wow everyone with their paint skills, only to be disappointed when the finished product doesn’t turn out as they envisioned. I know I am not a great painter; I don’t have the patience to be one. But I know I can do a decent job if I put my mind to it and paint within my limits. The key is to use many of the tools that are available to help make the job easier. One of the best purchases I’ve made is a 6” ruler that I use as a straightedge inside of a body. This makes it easy for someone like me who can’t draw a straight line to cut one in the liquid mask. Some people use adhesive shapes (like circles, squares, or even stars to name a few) as pre-cut masks to bring out a new dimension in their paint scheme.
Gary Kyes: When you look at the paint on a car, whether full -scale or RC, you will notice that the preparation that went into the paint job constitutes 80% of the work that went into the final results. If you don’t have things planned out well before you start, you may be doomed to a less than satisfactory result. I find masking tape to be easier to work with, but you need to use a good quality tape or you could have bleed problems. I like using an automotive quality masking tape (made by 3M) for several reasons. After you are done with an area and go to remove the masking tape, it doesn’t leave a gooey, sticky residue that could cause a blotching problem. It’s also easier to make a curve or bend without it tearing or kinking. I’m not a huge fan of the vinyl tape available from some companies; I’ve noticed that if you run vinyl tape around a curved surface, walk away, and return five minutes late r, the tape will have lifted up from the curved area. This can lead directly to potential bleeding problems. If you do wish to use vinyl tape, be very careful not to stretch it or problems will occur. Tamiya sells a yellow paper tape in four sizes from 6 to 40mm that works very well, especially for back taping. Because it is a thinner tape, it is easier to cut through and doesn’t drag on the knife blade as much. Speaking of which, you need to always use a fresh, sharp blade anytime you try to cut into masking material. A dull blade can catch and tear the masking material, pulling it away from the surface you want to mask off.
Applying the Paint:
Whether you use spray cans or an airbrush, there are basics that apply to both. I’ll discuss spray cans first, since they are the easiest to use and the most common as well. Instead of simply shaking the can to help prepare the paint, you may want to run the can under the faucet with warm water flowing over it. The paint tends to flow better out of spray cans when the ambient temperature is over 70 degrees, and the additional heat input also helps to pressurize the can a little more. Be very careful here, as you don’t need to overly heat up the can, all you are trying to do is get the can temperature above 70 degrees. By keeping the water temperature at a reasonable setting, you also ensure that you cannot be burned by overly hot water.
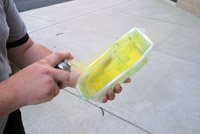 |
| We used Pactra spray paint on all of the bodies used here, but you can also use an airbrush as well. As you spray, use thin coats to prevent drips and runs. Also remember to start with the darkest color first. |
While this same trick doesn’t work with an airbrush, there are steps you can take before you start spraying that will make the job much easier. Have all your tips ready to go, making sure they are all clean and rinsed from the last time you used them. Nothing ruins your day faster than to spray what you think is white and have it come out pink because you didn’t rinse the tip out after the last time you used it to spray red. Don’t forget about the body of your airbrush, too, as old paint can collect in there, fouling up the action of the airbrush and affecting the flow of paint. When you begin to spray, hold the can about 8 –12 inches away from the area where you are going to paint (6 –8 for airbrushes), moving side-to-side using a smooth, flowing motion. Don’t glob the paint on in one thick coat, as using more, thinner coats will generally result in a better looking finished product.
Gary Kyes: Before you even think about pain ting, you need to be in a well-ventilated room so that the paint fumes don’t overcome you. If the body doesn’t have overspray film on the outside of it, take a plastic bag, such as the one the body came in, and tape it around the body. This will keep the paint on the inside of the body, where you want it. If you are inexperienced at painting, a piece of cardboard could be your new best friend. Use the cardboard as a test surface to see how fast or slow the paint will flow out of the can or airbrush. Additionally, use the cardboard to see how quickly you need to move side-to-side for the best and most even paint coverage. When you start to spray, depress the nozzle before you get to the part of the cardboard (or body) to start the spray, and don’t release it until after you have panned past the area you wish to cover. This technique prevents you from having an area of the body that has a lighter color than the rest of the area. As you spray, and this is extremely important, hold the can or airbrush perfectly perpendicular to the surface you are spraying. This ensures that the color distribution will be even and your lines will be as smooth as possible. Don’t go gonzo when applying the paint. Not only are multiple, thinner/lighter coats better for color consistency, but the solvent/thinner in the paint is designed to actually eat into the body’s plastic and if you put to o much on at one time it can actually cause damage, making it very brittle. When you are spraying with a water-based paint, such as Parma Faskolor, you will definitely want to use a hair dryer to help the paint dry between coats. When you use the hair dryer, hold the body so that any paint that might drip will do so away from your masked area. The reason for this is to again prevent bleeding.
Basic Effects:
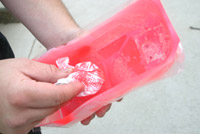 |
| When using a marble technique, blot the inside of the body wh ile the paint is still wet with a paper towel or other lint-free cloth. Remember to blot the paint; don’t smear. I used three coats of red before I backed it with white. |
Like I said, I am an average painter. I’ve painted up more than a few “One-Color Wonders” myself, but I will probably never paint a basic one-color body again since I’ve learned the sponge technique. A friend of mine pain t ed a body for me about two years ago, with the coolest effect in the blue sections of the paint —a white swirl pattern in the blue parts of the body. When I asked him how he had accomplished such a difficult -looking effect, he told me that it was quite easy and anyone could do it. Once he had sprayed down the first coat of the primary color (in this case blue), he simply blotted the still -wet paint with the bag that the body had come in. While he used the clear bag the body came in, you can use a sponge, paper towels, or even a paper bag to blot the body with. The key is to dab at the sections of the body ; don’t try to swirl the colors around by twisting your blotter side to side. This dabbing remove s random sections of the paint that ha ve just been sprayed down, and this process is repeated with each subsequent coat of paint. There will be sections of paint that will not be removed with any of the smudges, and those sections of the body will appear darker than some other sections. Once you have sprayed your final coat of paint and have finished blotting or sponging the body, back it up with white paint. This is what makes this effect work. The white will fill in any gaps in coverage as well as making the base color snap to life. All I can say is that once you see this done, you will never run a regular single-color paint scheme again.
Gary Kyes: One of my favorite yet easy techniques I use is called the Fade. You can use just two colors to do this, but I’ve used three and four colors as well. The one big thing to remember with Fades is that you need to use complementary colors, such as Red with Yellow and Orange. You can also use half-tones or different tones of the same color. On one of my favorite bodies, I used a Candy Blue and a solid Medium Blue and I was very impressed with the result. Once you have chosen the colors you are going to use, you should spray the darker color first, gradually going to lighter and lighter colors. In the event that you have to spray a lighter color first, back it with white, and if you have to paint white first, you should back it with silver. Follow this same pattern when working on smaller detail areas, such as stripes, as well. In all cases, make sure you allow each color to dry completely before applying another over it.
For the fade, you will need to decide if you want to fade the colors from front to rear or top to bottom. You want to start by spraying the first color at your normal speed for regular coverage but as you get to the area where the next color is going to overlap you need to move at about twice the speed so the paint is very thin and almost translucent. Before you actually spray the paint on the body, test your idea out on a piece of paper towel. This will let you practice how far and fast you should go with your beginning color before you start fading it out and leading into the secondary color. When you start to spray your second color, you will start at the point where you left the previous color thin and use the same technique as for the first .
Detail with Decals:
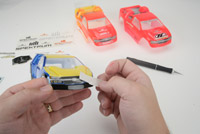 |
| One of the easiest ways to apply a decal is to pe el half the backing off, get the decal placed, and slowly pe el the remaining backing off as you apply it to the body. |
|
|
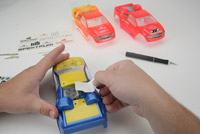
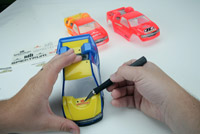
| When applying smaller decals, using an X-Acto knife can make things much easier. This allows me to make sure the decal is level and in the right spot. |
Each body has its own personality molded into it before you even take it out of the bag. Fans of almost any make full - sized car can replicate that same look and feeling with their R/C vehicles too. I happen to love the look of the full-size CK trucks, so I naturally fitted my personal Mini-T. But if you don’t actually use the included headlight and grill e decals, the body just looks like any old truck. Take a couple of extra minutes and apply the included detail decals, such as the grill e and headlights, the taillights, and any other detail graphics to add that extra touch of personality to your new shell. The reward will be well worth the effort. One little piece of advice that will save you aggravation later, and don’t ask how I know about this (ok, I did it myself once) : Before you apply any decals, make sure you peel the over spray film off the outside of the body. No matter how careful you are, how much time you spend, you will occasionally have a section of mask that may bleed through. While to some this may mean the end of a great body, this is where the truly creative come to life. Once a color has bled through there isn’t much you can do to fix the problem, but you can cover up a mistake with creative decal placement. Just running a blank body without any decals can look rather blah ; the use of decals and their placement can not only be the final touch to a great -looking body, but careful decal placement can also hide minor goofs and errors in the paint. Just remember that more is not always better, as a body with a million different decals can look overly busy and cluttered.
Gary Kyes: Stickering a body can be tricky, but if you take your time and are patient, you will be rewarded in the end. I like to peel the sticker off of the backing and then replace it so that it is half on and half off the backing. This will let you position it and make sure everything is straight before you put the sticker on for good. By leaving the backing on, you can remove, relocate, or otherwise change the placement without ruining the decal.
Mounting the Body:
This can be the make or break step in getting your new body ready, and yet this is the most common step people trip up on. All Team Losi bodies have mold lines in them as a guideline for cutting the front wheel wells out, along with the sides. Additionally, replacement bodies such as those for the Mini-T, LST, BK2, or MF2 also have molded -in dimples to indicate where the body postholes should be drilled. This is where the first mistake is often made, as I have seen countless bodies with jagged, oversized, or just otherwise ugly mounting holes. Put the hobby knife down when it comes to the body mount holes, and opt for a quality reamer. Remove just a little material at a time, test-fitting the body as you go along. The other common mistake happens when it’s time to open up the wheel wells. Again, I’ve seen people hacking at the trim lines with a hobby knife, a straight scissors, or other foreign object. If you have a steady hand, you can use a hobby knife to score the wheel well enough so you can simply bend it out. However, I have found that people with that steady of a hand are few and far between. Using an actual circle cutter will yield perfectly rounded and smooth wheel wells every time and won’t create jagged edges like using Lexan scissors could possibly do.
Gary Kyes: Instead of struggling to mount a painted body, mark the body mount holes while the body is still clear. That will make the job much easier. To get perfectly round wheel well holes, the Olfa Compass Cutter (OLF991) will do the trick each and every time. Simply mark the centerline of the axle (again this is easiest to do before you paint), fix the blade portion on the scribed wheel well marks, and rotate the compass to score the wheel well. Since the rear wheel wells aren’t scribed, use a tire as a template and mark where the rear wheel wells should be with a Sharpie marker.
Painting a body can be a challenging adventure if you have never done so before, but it is not as daunting as it might first appear. Like I said, you need to know your limitations and not get in over your head, but as you gain experience and confidence, definitely feel free to experiment with different things. I will be the first to admit that some of my coolest paint jobs have evolved out of something that I had first made a mistake on. I do want to thank Team Losi’s Gary Kyes for his input, and don’t forget to keep checking out www.TeamLosi.com and www.HorizonHobby.com for future articles and updates. |